PORTFOLIO
Tileable Atlas Material - UE4
Tools Used:
Unreal Engine 4, Photoshop.
Produced:
Material and Material Functions
The tileable atlas material allows the user to tile four separate textures in one atlas, this prevents the need of four separate materials for each texture.
Along with the tiling feature, the material also allows UV quadrant based texture application. For example, on the UV axis at 0,0 you have a quadrant going into each axis:
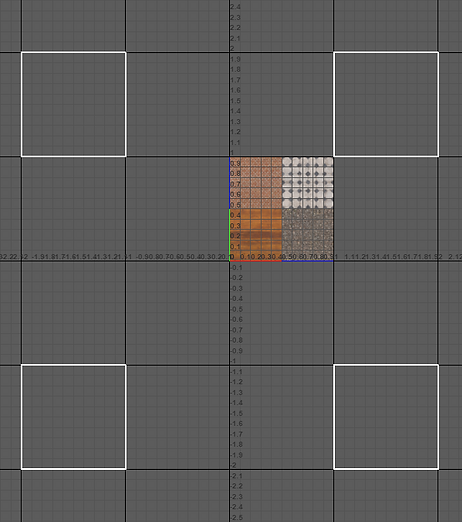
Each texture within this atlas is applied to a separate UV quadrant corresponding to the location of the texture within the atlas.
One of the biggest obstacles that I came across was the seam in between each texture. Because UE4 uses mipmaps to optimise it's texture size based on distance, when you would distance yourself from an object with this material applied you would see an obvious seam where the texture had been tiled, because it bled from the other textures in the atlas. To combat this I used some maths to determine how much padding I should add to a texture to stop the bleeding when mipped.
In UE4 a 2048x2048 texture uses 12 mips, to compensate for the mips I would need to add 12² padding to each texture within the atlas. So I would duplicate each texture and reduce the size by 24px from 1024, so that the texture is now 1000px in size. Now there's a 12px gap around each texture. To stop the padding causing any seams, I needed to make sure the textures where still tiling through the padding like so:

These duplicates are matched up with the new texture that is 1000px, that's why they snap within the square indicated by the rulers instead of on the rulers. After this is done for each texture, it will look like this:

You can't really notice a difference in the atlas aside from the corners of the textures, but that's just padding anyway so I didn't need to worry about that.
The material in UE4 works out how much of each texture shows by doing calculations based on the mip amount / atlas size and then works out the scale of the texture by calculating the effective tile size / actual tile size. As I made this material to work with different atlas sizes, I had to do these calculations for multiple sizes and created a multi-switch material function which allows the change of values based on one value which in this case is called "Atlas Size". 0 = 512x512, 1 = 1024x1024, 2 = 2048x2048.
After the offset values and scale have been calculated, they plug into another material function that I've created which separates each texture within the atlas. It does this by finding out the texture offset which are values based in 0-1 UV space, so 0,0 is used for the top left square and 0.5,0 is used for top right. Then depending on how many textures are within this atlas, the value "Num X/Y Tiles" calculates how many tiles are shown by using the fraction node on the base value UV position. This function then outputs two values, the coordinates of the base textures within the atlas and the fraction coordinates from the scale and offset values calculated from before.
These two values plug into a custom node which allows me to separate the use of the texture currently outputting, coordinates for the mipmapping and then the fraction coordinates for the texture mapping. So now with these mipmapping coordinates, I now have this padding which is used on the fraction coordinates texture and that's the smaller texture that I created within the atlas before.
This now outputs to four separate values: Top left, top right, bottom left and bottom right. These values now plug into another material function that I've created which figures out the quadrant locations. This allows the textures to tile as long as they're in the correct quadrant. To work out the quadrant locations I created a texture which masks each quadrant into separate RGB channels. To match the positions of the atlas, I've offset the mask texture so that the centre is at 0,0 UV space and clamped the mask texture so that no matter where the texture is in it's set quadrant, it will still have the correct texture applied.
Rally Track
 |  |  |  |  |  |
|---|
Platform:
PC
Tools Used:
Unreal Engine 4, Maya 2017, World Machine, Photoshop, SpeedTree.
Produced:
Art, Blueprints
Time Frame:
5 Days
I created this rally stage environment to improve my skills with World Machine and foliage.
World Machine and Terrain
World Machine was used to create the base terrain, such as the mountains and valleys. Once brought into Unreal Engine 4, I painted the terrain with the colour information provided by the colour map created in World Machine. I created my own materials for each surface type. Each material had the same available parameters, excluding the dirt track material which also included a world position offset parameter to give the track more depth.
Foliage
Almost every foliage type was provided by SpeedTree excluding the long grass. However, I created a global material for each SpeedTree asset to use. This reduced the amount of draw calls being used as they were all using instances of the global foliage material, in the same foliage actor instance.
I used two variants of the free monthly SpeedTrees for the tree foliage, this includes the Alaska Cedar and the European Aspen. As these trees are in different places around the globe, I changed to materials more to match the location of where this stage is set.
For the bushes I used the Bog Myrtle Bush. To add more variation I included a modifier to the global foliage material, that changes colour on every instance placed.
The long grass was produced by myself. I added the ability to apply camera facing meshes to the global material, removing the need of cross trees. However this provided lighting issues, to fix this I changed the mesh to use up facing vertex normals and created a global parameter that changes the brightness dependent on the time of day.
Each foliage type with over 1000 tris has appropriate LODs applied, with the last being a cross tree. Each LOD includes a cheaper material instance.
Blueprints:
Unreal Engine 4's blueprints were used to generate splines for the fences and the track lines. These actors were then merged using the "Merge Actors" tool, so that they were combined into a single mesh, removing the need of the blueprints being used during runtime.
View higher resolution screenshots at: https://www.artstation.com/artwork/BmD4P6
Racing Track Prop Assets
Platform:
PC
Tools Used:
Maya 2017, Photoshop, Unreal Engine 4
Produced:
Art, Blueprints
Time Frame:
27th August 2017 - 21st September 2017
I worked on a few blueprints within this project. The guard rail spline blueprint was the first. This allows designers to manipulate a single model into a larger line of the same model. For example, with pipes or walls.
The second blueprint controlled the wind speed. This allows the wind speed to be change at any given moment, allowing the flag to move back and forth. The cloth for the flag model was manipulated with Unreal Engine 4's "Clothing Tools".
The third and final blueprint allows the designer to change the electronic flag colour. The flashing light was done with an emissive that is controlled with the time modifier. After the material itself was created, I made seperate instances for each colour, giving control over the power of the light as well as the time period.
EDMQ
 |  |  |
|---|
Platform:
PC
Tools Used:
Unity, Photoshop, Maya 2017, 3D Coat
Produced:
Programming, Art, Audio
Time Frame:
March 2017 - November 2017
EDMQ or "Episode Doom Mission Quake" is a retro first person shooter inspired by classic shooters such as Doom, Quake, Duke Nukem 3D and Redneck Rampage.
EDMQ is being developed in Unity using the C# scripting language. It's still very early in development as it is primarily a side project, however I'm enjoying the process so far and I look foward to seeing the outcome.
Demo download link: https://conwak.itch.io/edmq
DROJAN
Drojan is a stealth/puzzle game, where the player controls a small drone to navigate through mulitple levels, avoiding obstacles and solving puzzles to acquire some stolen firmware.
This game was developed by two designers including myself, an artist as well as a programmer. I've developed the majority of the blueprints including the puzzle and mini map. I've was also in charge of audio, including recording sound effects and creating my own music.
Steam Greenlight Page: http://steamcommunity.com/sharedfiles/filedetails/?id=884877573
Platform:
PC
Tools Used:
Unreal Engine 4, FL Studio 12, Photoshop
Produced:
Blueprints, Audio
Time Frame:
September 2016 - May 2017
Radient Darkness
Radient Darkness is a 2D god game, where the player has to help their followers get off an island before a Tsunami hits. They must order their followers to gather resources such as wood and wheat to build a boat and escape.
This game was developed in Unity using the C# scripting language. The pixel art style was created in Photoshop.
Platform:
PC
Tools Used:
Unity, Photoshop
Produced:
Programming, Art
Time Frame:
January 2017 - May 2017